
What to Know Before Buying Grab Bars for Bathroom Safety
Buying grab bars for bathroom safety sounds straightforward. Walk into a hardware store, pick a bar that looks sturdy, take it home, and screw it to the wall. In practice, this approach produces grab bars that are the wrong type for the intended use, installed at the wrong height, mounted into drywall rather than structural support, and — in the worst cases — bars that pull free from the wall when force is applied during a fall.
The result of a poorly selected or poorly installed grab bar is not simply an ineffective safety modification. It is a false sense of security that can be more dangerous than no bar at all. A person who grips a bar during a loss of balance and has it give way is in a worse position than someone who never reached for support — because the expectation of resistance that does not materialize disrupts the recovery response entirely.
At Grab Bar Los Angeles, we have spent years installing ADA-compliant grab bars throughout Los Angeles County. In that time, we have seen every variation of the self-selection and DIY installation problem. This guide covers everything you actually need to know before buying grab bars for bathroom safety — so that whether you work with us or another professional, you make decisions that will genuinely protect the people you care about.
Why Bathroom Grab Bars Matter — By the Numbers
36 Million Falls among adults 65+ reported annually in the U.S. | 80% Of falls among seniors occur in the bathroom | $50 Billion Annual medical cost of fall injuries in the United States | 1 in 4 Adults over 65 will experience a fall this year |
The Most Important Thing to Know Before Buying Grab Bars for Bathroom Safety

Before discussing any product specification, there is one overarching principle that every buyer needs to internalize: a grab bar is only as safe as its installation. The best grab bar on the market — stainless steel, ADA-compliant diameter, rated for 500 pounds, textured grip — becomes a dangerous liability if it is mounted only into drywall without reaching a stud or blocking board.
This is the single most important distinction between grab bars purchased at a hardware store and grab bars installed by a professional. The bar itself is a commodity. The installation — knowing where the studs are, confirming adequate stud depth, using the correct fasteners, mounting at the precise height for the intended user — is the service. Buying the most expensive bar and installing it incorrectly is still a safety hazard. Buying a well-specified bar and having it professionally installed is genuine fall protection.
With that principle established, here is everything you need to know about choosing the right grab bar for each specific use case in your bathroom.
Step 1: Choose the Right Type of Grab Bar for Each Location

The type of grab bar — its orientation, configuration, and mounting style — should be determined by what the user will be doing at that location. A bar that is perfect for one use case may be entirely wrong for another. Here is a complete breakdown of grab bar types and where each belongs.
Bar Type | Best Locations | Best Used For | When to Avoid |
Horizontal Bar | Shower wall, beside toilet, bathtub long wall | Lateral support and balance during standing; stable grip at consistent height | Entry points where vertical support is needed for step-in movements |
Vertical Bar | Shower entry, tub entry, bathroom doorway | Step-in and step-out transitions; push-to-stand and lower-to-sit movements | Mid-shower or bath areas where lateral support is more useful |
Angled / Diagonal Bar | Beside toilet, inside shower corner | Supports both lowering and rising movements; adapts to changing grip height during transfer | Locations requiring purely lateral or purely vertical support |
Flip-Down / Folding Bar | Beside toilet in smaller bathrooms | Space-saving; folds flat when not in use; useful in multi-user households | Primary shower support — fixed bars are more reliable for high-frequency use |
Floor-to-Ceiling Bar | Open bathroom areas without studs at ideal locations | No wall mounting required; adjustable to any ceiling height; strong vertical support | High-humidity shower interiors — tension-mounted bars require periodic re-tensioning |
Related Reading: Our post on how slippery surfaces increase fall risks without proper grab bar support explains the specific movements that create the highest fall risk in each bathroom location — which directly determines which grab bar type is most appropriate for each area. |
Step 2: Understand ADA Standards — The Minimum Safety Benchmark

The Americans with Disabilities Act (ADA) establishes specific standards for grab bar specification in accessible bathrooms. While ADA standards technically apply to commercial and public facilities, they represent the most thoroughly researched and field-tested safety specifications available for residential use as well. At Grab Bar Los Angeles, every installation we perform meets or exceeds ADA standards as a baseline.
ADA Specification | Standard Requirement | Why It Matters for Safety |
Diameter | 1.25 to 1.5 inches outer diameter | Allows full hand wrap for maximum grip strength — too thin or too thick reduces control |
Weight capacity | Minimum 250 lbs static load | Fall arrest forces can exceed body weight significantly — ADA minimum ensures safe load bearing |
Clearance from wall | 1.5 inches between bar and wall surface | Allows fingers to wrap fully around bar and pull without knuckle contact with wall |
Toilet bar height | 33 to 36 inches above finished floor | Aligned with seated hip height for maximum mechanical advantage during transfers |
Shower bar height | 33 to 36 inches for horizontal bars | Comfortable standing grip height for average adult; adjustable for user-specific needs |
Bar length | Minimum 42 inches beside toilet; 36 inches in shower | Provides adequate range of grip positions for different body positions during use |
Surface finish | Non-slip textured grip surface required | Wet hands on smooth chrome bars dramatically reduce grip reliability |
Mounting | Anchored to wall studs or blocking — not drywall only | Drywall-only mounting fails under load — studs or blocking required for safety |
For the complete ADA Standards for Accessible Design specifications, the U.S. Access Board publishes detailed technical guidance. Note that ADA specifies minimums and not maximums — for individual users with specific mobility profiles, bars may be positioned higher, lower, or at different angles than the ADA baseline based on a professional home safety assessment.
Step 3: Select the Right Material and Finish
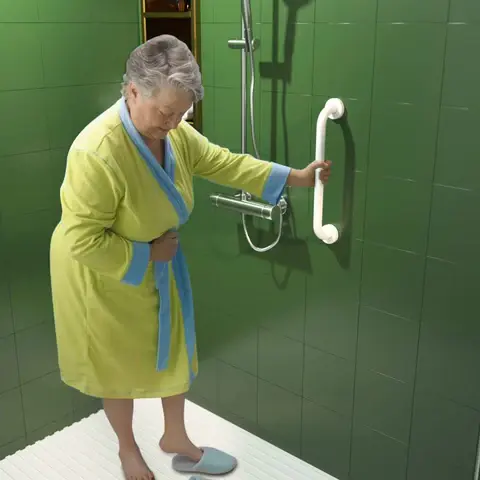
Material selection affects durability, grip quality, maintenance requirements, and aesthetics. Not all materials perform equally in wet bathroom environments, and the finish affects both the look of the bar and — critically — how reliably it can be gripped with a wet hand.
Material | Durability in Wet Environments | Grip Quality | Best For |
Stainless Steel | Excellent — rust and corrosion resistant | Good with textured finish; smooth chrome can be slippery when wet | All bathroom locations — the most recommended material for longevity and safety |
Chrome-Plated Steel | Good — may show rust at scratches over time | Smooth finish only — can be slippery; requires textured grip tape or knurling | Lower-moisture areas; best with non-slip coating added |
Brushed Nickel | Good — hides water spots and fingerprints well | Similar to chrome — smooth finish unless knurled | Aesthetic preference in modern bathrooms; functional with textured finish |
Matte Black | Good — powder-coated finish resistant to moisture | Similar to brushed nickel; often available with textured surface | Contemporary bathroom designs; good visibility contrast for low-vision users |
Plastic / Nylon | Poor — not recommended for primary safety use | Variable; warm to the touch but structural integrity insufficient | Avoid for safety-critical applications — insufficient load rating for fall protection |
Our recommendation for virtually all bathroom applications: brushed stainless steel with a knurled (textured) grip surface. This combination offers maximum corrosion resistance, reliable wet-hand grip, long service life, and an appearance that integrates well with most modern bathroom aesthetics. All grab bars supplied and installed by Grab Bar Los Angeles are heavy-duty, rust-resistant stainless steel with non-slip grip surfaces.
Step 4: Get the Size and Weight Capacity Right

Length — Longer Is Usually Better
Grab bar length determines the range of grip positions available to the user as they move through the bathroom activity — approaching the toilet, sitting, shifting position, rising. A bar that is long enough provides continuous grip support throughout the movement arc. A bar that is too short forces the user to reach for support at an angle that may not provide adequate mechanical advantage. ADA minimums of 36–42 inches for toilet-area bars are a strong guideline — shorter bars should only be used where space constraints make longer bars impossible.
Diameter — 1.25 to 1.5 Inches Is the Standard
The outer diameter of the bar determines whether it can be gripped fully and securely. Bars narrower than 1.25 inches do not allow a full wrap grip for most adults and reduce the maximum force that can be safely applied. Bars wider than 1.5 inches are difficult to grip fully, particularly for users with reduced hand strength or arthritis. The ADA standard of 1.25 to 1.5 inches is biomechanically derived — it represents the range that allows the maximum grip force for the widest range of adult hand sizes.
Weight Capacity — Always Verify Before Purchasing
Every grab bar sold for safety use should have a clearly stated static load rating. Minimum 250 pounds is the ADA standard — do not purchase any bar without this specification confirmed. During a fall recovery, the force applied to a grab bar can significantly exceed the user's body weight due to the dynamics of the fall arrest motion. A bar rated for 250 pounds provides an adequate safety margin for the majority of residential users. For users over 200 pounds or in higher-risk scenarios, bars rated for 300–500 pounds are preferable.
Clearance — The 1.5-Inch Rule
The space between the bar and the wall surface must allow the user's fingers to wrap fully around the bar and grip it securely. ADA requires 1.5 inches of clearance between the bar surface and the mounting wall. Bars installed with less clearance force the user to grip with a partial wrap, which reduces grip strength and increases the risk of the hand slipping off during a sudden load application.
Step 5: Plan Placement Before You Buy Anything
One of the most common and costly mistakes homeowners make when buying grab bars is purchasing bars first and then figuring out where to put them. Placement should be determined before any product purchase — because the placement decision affects which bar types, lengths, and orientations you need at each location.
Location | Recommended Height | Orientation | Primary Purpose |
Inside shower — side wall | 33–36 inches AFF | Horizontal | Lateral stability during showering; grip while turning or reaching |
Shower entry point | 34–38 inches AFF | Vertical | Step-in and step-out support; prevents entry slip |
Beside toilet — side wall | 33–36 inches AFF | Horizontal or angled | Lowering onto and rising from toilet; most critical location for seniors |
Behind toilet — rear wall | 33–36 inches AFF | Horizontal | Supplemental support for lateral stability on toilet |
Bathtub — long wall | 24 inches AFF | Horizontal | In-tub stability; support while bathing in seated position |
Bathtub entry/exit | 34–38 inches AFF | Vertical or angled | Stepping over tub threshold — highest fall risk point in bathroom |
Near sink/vanity | 33–36 inches AFF | Horizontal | Stability while standing for grooming; useful for low-vision users |
Note: "AFF" = above finished floor. Heights shown are ADA-standard ranges. Specific user heights and mobility profiles may warrant individual adjustment — this is one of the key outputs of a home safety assessment.
Step 6: Understand Why Professional Installation Is Non-Negotiable
This is the section that most online grab bar buying guides skip — which is exactly why so many residential grab bar installations fail. The bar is only one component of a safe grab bar system. The installation is the other component — and it is the one that determines whether the bar will hold when it matters most.
The Stud-Mounting Requirement
A grab bar mounted only into drywall will fail under load. Drywall is a brittle, low-density material that cannot bear the point loads generated when a person grips a bar during a fall. Every safety grab bar must be anchored into wall studs or into a solid blocking board installed within the wall cavity. Studs in standard residential construction are 16 inches apart — which means the position of available studs directly determines where bars can and cannot be safely mounted. A professional installation either locates and uses existing studs or installs blocking to provide anchor points wherever the optimal placement position requires it.
Why Suction-Cup Bars Are Not Safety Bars
Suction-cup grab bars are marketed as convenient, installation-free bathroom safety products. They are not safety bars. No suction-cup mounted bar can reliably bear the forces generated during a fall. Suction cups lose adhesion on irregular or textured tile surfaces, in high humidity conditions, and over time as the suction seal degrades. A suction-cup bar that holds 50 pounds in a dry, controlled test may provide zero resistance during an actual fall. As our post on why not all grab bars are designed for long-term safety explains, the consequences of a bar that fails during use are worse than having no bar at all.
The Height and Angle Precision Requirement
A bar mounted two inches too high or too low for the specific user's body measurements provides significantly less mechanical advantage than a correctly positioned bar. For toilet-area bars, the correct height relative to the user's seated hip height determines whether the bar allows them to push to standing or merely provides a grip with no useful mechanical leverage. Our home safety assessments include precise height measurements for each user to ensure every bar is positioned for maximum functional benefit.
Tile Drilling and Waterproofing
In tiled bathroom surfaces, grab bar installation requires drilling through tile without cracking it, using correct anchoring hardware for the tile and substrate thickness, and sealing penetrations to prevent water intrusion behind the tile. Incorrect drilling technique or failure to seal penetrations can cause tile cracking, water damage behind the wall, and accelerated deterioration of the installation. Professional installers have the tools and experience to complete tile penetrations correctly on the first attempt.
What Professional Installation Includes from Grab Bar Los Angeles
Our grab bar installation service includes: stud location and verification, optimal height and angle determination for each user, correct fastener selection for wall type and substrate, tile drilling without cracking where applicable, waterproof sealing of all penetrations, and final load testing of each installed bar. We provide ADA-compliant installations across all of Los Angeles County — from Glendale and Burbank to Arcadia, Monrovia, West Covina, and Glendora.
Common Grab Bar Buying Mistakes and How to Avoid Them
Based on years of installation experience in Los Angeles County, here are the most common mistakes homeowners make when buying grab bars for bathroom safety — and how to avoid each one.
Mistake 1 — Buying Based on Aesthetics Alone
Decorative grab bars — designed to blend with towel bars and other bathroom hardware — are sold in every major home improvement store. Many have inadequate weight ratings, smooth chrome finishes that are slippery when wet, and mounting hardware designed for appearance rather than structural load. Safety should be the primary selection criterion, with aesthetics a secondary consideration.
Mistake 2 — Purchasing One Bar and Assuming It's Enough
A single bar beside the toilet does not provide fall protection in the shower. A bar inside the shower does not protect against the bathtub entry fall. Comprehensive bathroom safety typically requires a minimum of three to five bars — inside the shower, at the shower entry, beside the toilet, at the bathtub entry, and ideally near the vanity. A home safety assessment identifies exactly which locations in your specific bathroom carry the highest risk and prioritizes installations accordingly.
Mistake 3 — Assuming Any Bar Will Fit Any Wall
Different wall constructions — standard drywall over wood studs, cement board in tiled wet areas, plaster walls in older Los Angeles homes — require different fasteners, drilling techniques, and installation approaches. A bar installation that is straightforward on a standard drywall wall may require blocking in a plaster wall or special anchors in a cement board substrate. Professional installers identify wall construction before any drilling begins.
Mistake 4 — Ignoring Ongoing Maintenance
Even a correctly installed grab bar requires periodic inspection and maintenance. Mounting screws can loosen over time with repeated use. Tile caulk around the mounting flange can crack and allow water intrusion. Chrome finishes can corrode at scratches. As our post on why ignoring small grab bar issues leads to major accidents explains, a bar that felt firm at installation and has gradually loosened over time may provide no useful resistance during a real fall. Annual inspection of installed bars is a standard maintenance practice.
Mistake 5 — Delaying Purchase Until After a Fall
The single most consistent pattern we observe in our installation work is that most calls come from families responding to a fall that has already occurred. The financial cost of a single hip fracture hospitalization in Los Angeles — typically exceeding $30,000 — dwarfs the cost of a complete professional grab bar installation by an enormous margin. The right time to buy and install grab bars is before the fall, not in response to one.
Related Blog Posts:
Frequently Asked Questions
Q: What should I look for when buying grab bars for bathroom safety?
A: The five most important factors when buying grab bars for bathroom safety are: type (horizontal, vertical, or angled — matched to the specific use location), material (stainless steel with textured grip is recommended), weight capacity (minimum 250 pounds for safety use), diameter (1.25 to 1.5 inches per ADA standards), and installation method (stud-mounted by a professional, never suction-cup or drywall-only). Getting any one of these wrong can turn a safety product into a hazard.
Q: What is the ADA standard for grab bars in bathrooms?
A: ADA standards for bathroom grab bars specify: outer diameter of 1.25 to 1.5 inches, minimum weight capacity of 250 pounds, 1.5 inches of clearance between bar and wall, non-slip textured grip surface, and height ranges of 33 to 36 inches above finished floor for toilet and shower areas. These specifications are biomechanically derived and represent the most thoroughly researched safety standards available for residential use.
Q: Can I install a grab bar myself or do I need a professional?
A: Professional installation is strongly recommended for any grab bar used for primary fall protection. Correct installation requires locating wall studs or installing blocking, selecting appropriate fasteners for the wall construction, drilling tile without cracking it where applicable, and sealing all penetrations against water intrusion. A grab bar mounted only into drywall will fail under fall-arrest loads. The bar itself may cost $30 to $150 — professional installation ensures it actually works when it matters.
Q: Are suction cup grab bars safe for seniors?
A: No — suction-cup grab bars are not safe for use as primary fall protection. Suction cups lose adhesion on textured or irregular tile surfaces, degrade over time in high-humidity environments, and cannot reliably bear the forces generated during a fall. A suction-cup bar that holds in normal use may provide zero resistance during an actual fall event. Only wall-mounted grab bars anchored to structural members should be used for safety applications.
Q: What size grab bar do I need for beside the toilet?
A: For beside the toilet, ADA standards recommend a grab bar of at least 42 inches in length, mounted horizontally on the side wall at 33 to 36 inches above the finished floor. The bar should extend from the front edge of the toilet forward to allow the user to grip it while approaching, and rearward to provide support during the full movement arc of sitting and standing. An angled bar is an excellent alternative — it accommodates both the lowering and rising movement in a single bar.
Q: How many grab bars does a bathroom need?
A: A fully protected bathroom typically requires a minimum of three to five grab bars: at least one inside the shower or bathtub for stability during bathing, one at the shower or tub entry for step-in and step-out support, one or two beside the toilet for transfer support, and ideally one near the vanity for stability during grooming. The exact number and placement depends on the specific bathroom layout and the mobility needs of the primary user. A professional home safety assessment identifies the optimal configuration.
Q: What is the best material for bathroom grab bars?
A: Brushed stainless steel with a knurled or textured grip surface is the best material for bathroom grab bars. Stainless steel is rust-resistant, highly durable in wet environments, and capable of meeting the weight capacity requirements for safety use. The textured grip surface ensures reliable hand contact even with wet or soapy hands. Smooth chrome finishes should be avoided or supplemented with grip tape. Plastic and nylon grab bars do not have adequate load ratings for safety applications.
Q: Does Grab Bar Los Angeles serve my area?
A: Grab Bar Los Angeles serves homeowners, seniors, and families throughout Los Angeles County and surrounding areas, including Glendale, Burbank, Arcadia, Pasadena, Monrovia, West Covina, Covina, Glendora, La Crescenta, South Pasadena, La Verne, and many surrounding communities. Call us at 818-939-9615 or visit grabbarlosangeles.com to check availability in your area and schedule a free home safety assessment.
References & Reputable Resources
Skip the Guesswork — Get the Right Grab Bar, Installed Right
Choosing a grab bar involves size, material, type, placement, and installation method — and getting any one of these wrong can turn a safety solution into a safety hazard. Grab Bar Los Angeles handles every decision for you, from your free home safety assessment through professional ADA-compliant installation. One call covers everything.
CALL NOW: 818-939-9615 Request a Free Assessment: grabbarlosangeles.com
Serving Glendale, Burbank, Arcadia, Pasadena, Monrovia, West Covina, Covina, Glendora & all of Los Angeles County |


Comments