
Recommended Grab Bar Placement: A Room-by-Room Reference Guide

A grab bar installed in the wrong spot is a strange kind of failure — the fixture itself might be perfectly built, properly anchored, and rated for the right load, and it still won't help anyone, because it's not where a hand actually lands during a fall or a transfer. Placement isn't a minor detail layered on top of installation; it's the decision that determines whether a grab bar does its job at all.
This guide breaks down recommended grab bar placement room by room — toilet, shower, and tub — along with what changes depending on the specific layout you're working with.
Why Placement Varies by Room
Each location in a bathroom involves a different movement pattern. Near a toilet, someone needs support through a sit-to-stand transfer. In a shower, support needs to cover stepping over a threshold and standing steady while washing. At a bathtub, the movement is often a seated transfer in and out, sometimes over a tub wall. Because these movements are different, the ideal bar height, length, and orientation differ too — which is why a single placement rule applied everywhere in the bathroom usually leaves at least one location under-supported.
Toilet Area Placement
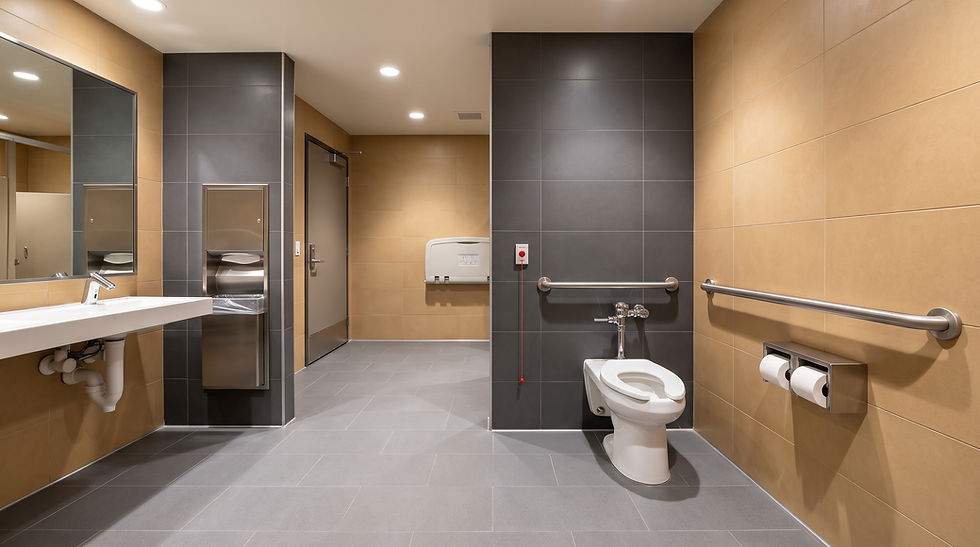
The most consistent toilet-area layout uses two bars working together: a side-wall bar mounted 33 to 36 inches above the finished floor, extending at least 42 inches along the wall, with its front edge no more than 12 inches from the rear wall, plus a rear-wall bar for added support standing straight up. Where no side wall exists, a floor-to-ceiling support pole typically provides more usable leverage than a rear-wall bar alone.
The side-wall bar is the one that does most of the work during a transfer, since it provides a stable pulling point throughout the entire motion — sitting down, bracing while seated, and pushing back up. A rear-wall bar on its own, without a side-wall counterpart, leaves someone without lateral support exactly when they're most off-balance.
Shower Placement
Shower grab bars generally need to cover two distinct moments: stepping over the threshold, and standing steady while washing or transferring onto a shower seat. A vertical bar positioned near the shower entry supports the step-over motion, while a horizontal bar along the back or side wall supports standing balance throughout the rest of the shower routine.
Shower compartment type changes this calculation. A small transfer-type shower needs a different bar configuration than a larger roll-in shower designed for wheelchair access, since the available wall space and the specific transfer motion both shift with the layout. In smaller showers, a single well-placed bar may need to serve both functions, which makes getting its exact position right even more important than in a larger space with room for two or three bars.
Not sure where your bars should actually go? Recommended placement changes based on your specific bathroom layout and who's using it. Our team can walk through your space and recommend exact positioning before anything gets installed. Contact us to get started.
Bathtub Placement
Bathtub placement depends heavily on whether the tub has a built-in seat. For tubs without a seat, placement typically includes a bar on the back wall positioned to assist standing from a seated position in the tub, plus a bar near the control end to support getting in and out over the tub wall. For tubs with a built-in seat, placement shifts to support the specific transfer onto and off of that seat, which may call for a different bar position than a standard tub layout would use.
This is one of the areas where a generic placement diagram can actually work against the goal — a bar positioned for a seatless tub won't necessarily serve someone using a tub with a transfer bench or built-in seat, because the movement itself is different.
What Doesn't Change by Room
Regardless of location, a few placement principles hold constant: the bar needs 1.5 inches of clearance from the wall for a secure full-hand grip, a diameter between 1.25 and 1.5 inches, and — most importantly — anchoring into solid wall blocking or a stud rather than drywall or tile alone. Placement decisions only matter if the bar is actually secured to hold real weight once it's in the recommended spot.
Placement Mistakes That Undermine Otherwise Good Installations

Copying a generic diagram without accounting for the specific bathroom layout or the person using it
Installing only one bar in a location that calls for two working together
Measuring height from an assumed floor level rather than the actual finished floor
Prioritizing wall blocking location over correct placement — moving the bar to wherever a stud happens to be, rather than finding blocking at the position that's actually needed
Treating toilet, shower, and tub placement as interchangeable, when each location serves a different movement
That last point is worth emphasizing: the temptation to use one placement rule everywhere in the bathroom is understandable, but it's also the most common reason a technically "installed" grab bar doesn't end up getting used the way it's supposed to.
Ready to have placement assessed for your specific bathroom? Our professional installers evaluate toilet, shower, and tub areas individually and install to the placement each one actually calls for. See our grab bar installation service to get started.
Choosing Bars to Match Placement, Not the Other Way Around
Once placement is determined, bar selection should follow from it — a vertical bar for a step-over motion, a longer horizontal bar for standing support, an angled bar where one fixture needs to serve two movements in limited space. For more on choosing shower-specific bars once placement is settled, see our guide on best shower grab bars for seniors. And if cost is a factor in deciding how many bars to install across multiple rooms, free grab bar installation programs for seniors may help offset installation across more than one location.
Why Getting Placement Right the First Time Matters

Redoing a grab bar installation because the first placement didn't actually work means patching and re-drilling a wall that's already been opened once — often into tile or a finished surface where a second attempt is more visible and more disruptive than the first. This is one of the strongest arguments for having placement assessed by someone who installs these fixtures regularly, rather than relying on a generic diagram and hoping it matches the specific bathroom. It's also one of the reasons DIY placement decisions carry more risk than they appear to on the surface — a placement mistake often isn't obvious until the bar has already been in use for a while. Our guide on why DIY grab bar installation can become a safety risk covers this in more depth, including the specific placement and anchoring mistakes that are easy to miss without professional experience.
Frequently Asked Questions
1. Does grab bar placement differ between the toilet, shower, and tub?
Yes. Each location supports a different movement — sit-to-stand near the toilet, stepping over a threshold and standing balance in the shower, and a seated transfer at the tub — so recommended height, length, and orientation vary by location.
2. What's the recommended height for a toilet-area grab bar?
ADA specifications call for a mounting height between 33 and 36 inches above the finished floor, measured to the top of the gripping surface.
3. Where should a shower grab bar be placed if the shower is small?
In smaller showers, a single bar often needs to support both the step-over motion and standing balance, which makes exact positioning especially important — typically near the entry point while still being reachable during the rest of the shower routine.
4. Does a bathtub with a built-in seat need different bar placement than one without?
Yes. A tub with a built-in seat needs placement that supports the transfer onto and off of that seat specifically, which may differ from the standard back-wall and control-end placement used for a seatless tub.
5. Can one grab bar placement rule apply to the whole bathroom?
Not reliably. Because each location involves a different movement pattern, a single placement rule applied everywhere often leaves at least one area — most commonly the shower or tub — without adequate support.
6. What clearance does a grab bar need from the wall?
A minimum of 1.5 inches of clearance is recommended, giving enough space for a full hand grip without the knuckles hitting the wall surface.
7. Should placement be decided before or after finding wall blocking?
Placement should be decided first, based on the movement it needs to support. Wall blocking should then be located at that position — not the other way around, where the bar gets moved to wherever a stud happens to be.


Comments